Wednesday, November 30, 2011

Masculine Birthday Challenge Greeting Card

Hi!  Today's card qualifies for a few challenges at SplitcoastStampers: CAS146--clean and simple sketch and CC351--color challenge (Kraft, Pear Pizazz, White), and one over at Birthday Sundaes--any birthday card.

I decided I needed some masculine cards and needed a break in my holiday card making.  Granted, the break will be short one, as I've been having too much fun playing with sets I haven't taken out in way too long!

Anyway, here it today's masculine, clean and simple birthday card.

  
 I started with a base of Kraft, scored and folded from the top and then rounded all four corners.
I used my argyle embossing folder and embossed a 3x3" square of my Pear Pizazz with rounded corners. 


 I stamped my tree from Lovely as a Tree on white in Chocolate Chip.  Then I trimmed the image to 2 1/2" square and rounded the corners.


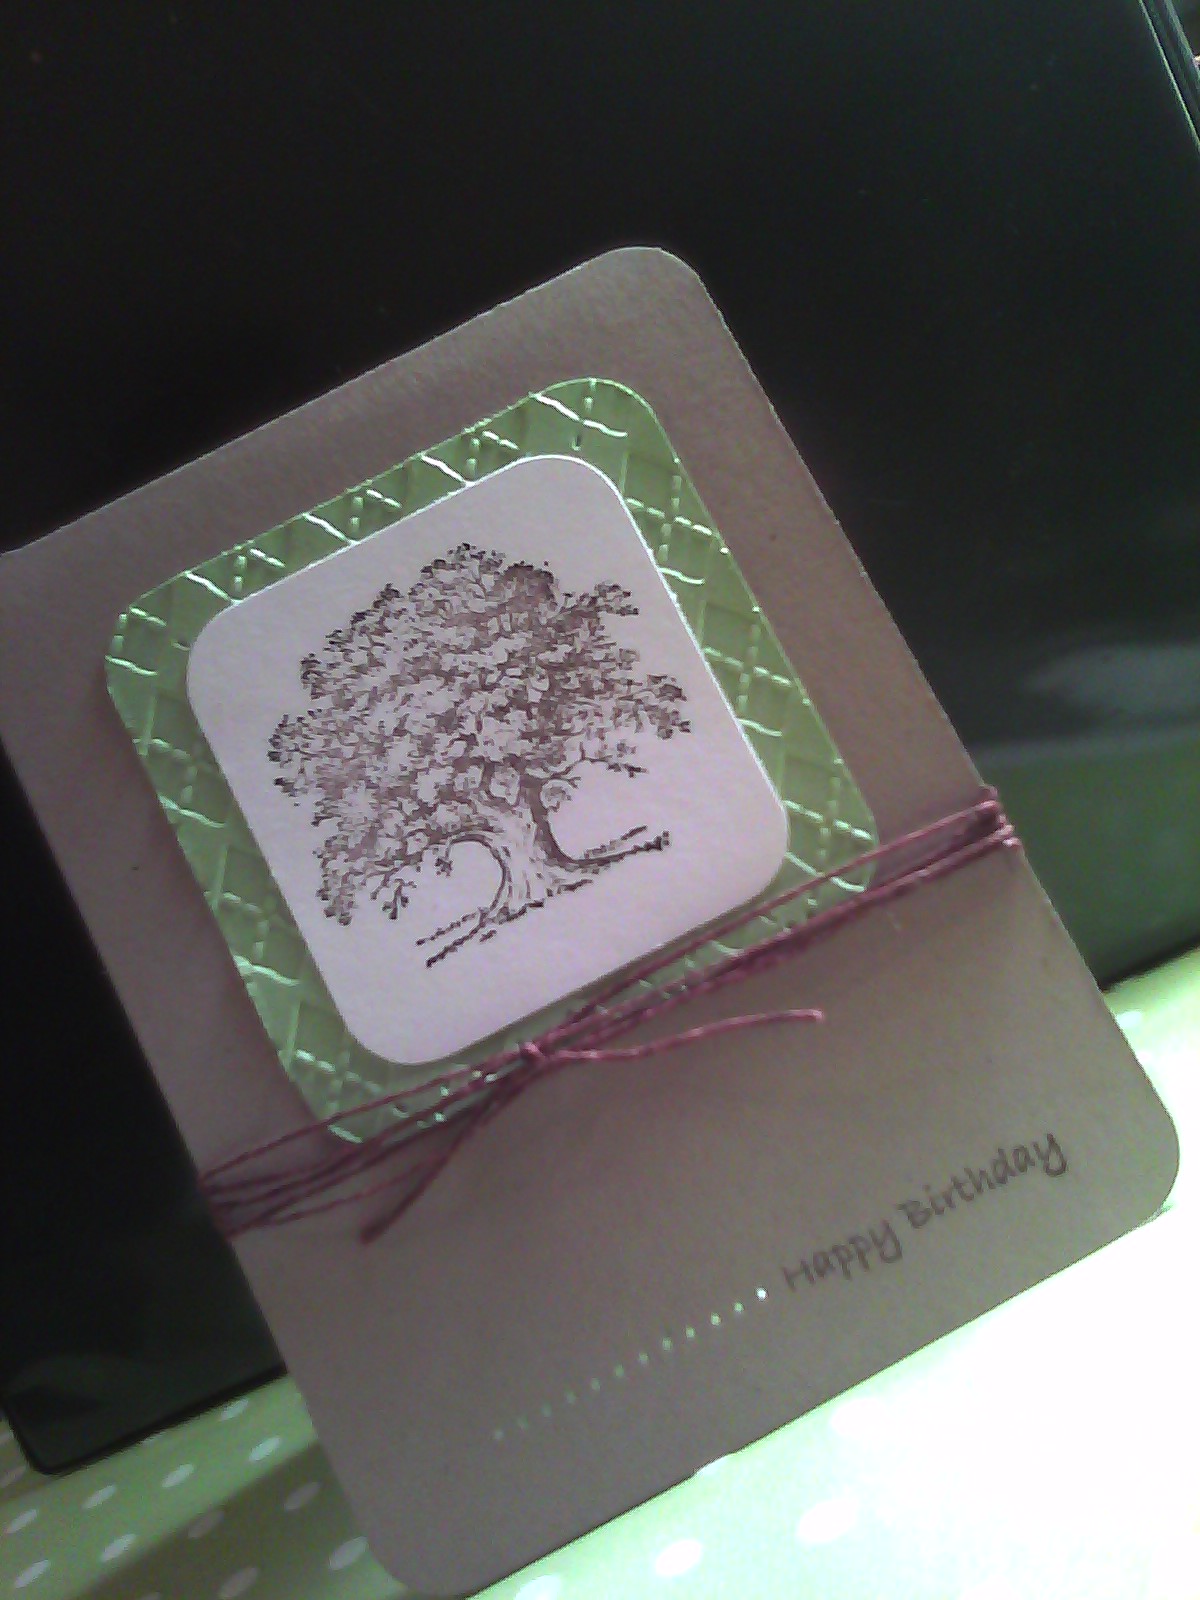
 I stamped the sentiment from All Ocassions in Chocoalte Chip and added a line of piercing that extended to the end of my piece of Pear Pizazz, and added chocolate colored hemp twine to finish off the card.

Thanks for looking!

Tuesday, November 29, 2011

Christmas Ornament Greeting Card

I mentioned a few days ago that I helped my friend Brenda design and make her Christmas cards this year.  Her first time stamping, but she did a great job!  Today's card is another one of the one we made together.

 Brenda did the stamping and assembly herself.  We used the sentiment from Peaceful Wishes, and then used the pine tree from Lovely as a Tree for the bough that the ornaments are hanging from.
 It's difficult to see in the pictures, but Olivia and I ran the ornament paper through the dot embossing folder before punching them out.
 We tied hangers at different lengths made of hemp twine, and adhered the ornaments with pop dots.
Here is one final look at the card.

Thanks for looking!

Monday, November 28, 2011

Christmas Angel Challenge Greeting Card

I had a great time making this card and had to post it today instead of the one I was originally going to post.  This card works for two challenge blogs:  Papertake Weekly was to make a Christmas card, and Sketch Saturday #183 was this sketch.


So, here is my card.

 I went with a standard A2 size card rather than a square, but other than that change and the addition of a poinsettia in the bottom corner, I followed the sketch pretty closely.


 I used two stamp sets on this card, and one I haven't used in a LONG time!
The angel and the sentiment on the inside of the card which reads "May the wonder and peace of Christmas be yours." are from the Stampin Up set On Angel Wings.  The Christmas Greetings sentiment is from the Stampin Up set Grateful Greetings.

 I used a base of Very Vanilla, a layer of Old Olive which I embossed with the square lattice embossing folder.  I also used 1/2" strips of DSP to cover my layer behind the angel and ran that through the same embossing folder.  The two circles to the left of the image are from the same DSP.
 I used the five petal flower punch to make the poinsettia and layered it on top of a prima leaf.

I added pearls to the sentiment, the center of the poinsettia, and graduated pearls on the angel image.

Here is one final look at the card.

Thanks for looking!

Sunday, November 27, 2011

Tall and Slim Holiday Greeting Card

It isn't often that I make cards that are tall and thin, but I saw the Sketch Challenge #143 at Card Patterns, and I had to participate.  This card also works for the Anything Christmas challenge at Stamptacular Sunday Challenge Blog

 I used my sewing machine, punches, and three stamp sets for this card.  I'm not sure if I'm 100% pleased with the results, but I'll use the sketch again :0)

 The top stamped image is from So Many Scallops and I heat embossed it in gold powder.  I punched out the center with a 1" circle and then used a 1 1/4" punch in green, and the scallop to punch out the rest of the embossed image.
 I used twine, buttons, and a scallop border for more dimension.

 Here is a closer look of the embossed image.
 I used a stamp from Trendy Trees and Versa Mark ink for the Bravo Burgundy layer that the twine is wrapped around.

 The inside of the card is stamped from the third set.
One more look at the final card.

Happy Stamping!

Saturday, November 26, 2011

Missoni Tag Upcycle Thirfty Birthday Greeting Card


Today I'm sharing with you a card that I used a tag from a Missoni for Target tote bag.  I loved the pattern on the tag, so I decided to use it on a card.

This card also qualifies for the color challenge over at Splitcoaststampers CC350 which is Blushing Bride, Pear Pizazz, and Marina Mist.  I don't have Blushing Bride or Marina Mist, so I used Baja Breeze and Blush Blossom.
 I stamped the base of the card with the rose from Fifth Avenue Floral and used Baja Breeze ink.
 I used the sentiment from Whimsical Words, and the wide oval punch to cut out the birthday greeting.
 I used the eyelet border punch for two additional layers.
Here is another final look at the card.  What will you do to make your stamping/scrapping dollar stretch?

Friday, November 25, 2011

Cricut Christmas Snowflake Greeting Card


There is nothing wrong with simple cards.  That has been my theme as I get back into my creative and blogging routine.  So, today I bring you another simple card. 

 This card meets three challenges over at Splitcoaststampers.  TLC352 (Make Snow) I consider the pearls I added to the snowflake enough.

 The second challenge CAS145 (Christmas/Winter Clean and Simple).  This one is very clean and simple with a Winter/Christmas theme.  The third challenge this card meets is the F4A92 (Black and White Christmas)--ok, I used Very Vanilla and black, but close enough! 

 I used the stamp set Home for Christmas for the front sentiment and the inside is stamped with the sentiment from Festive Favorites.
I again used my Cricut and the Accent Essentials cartridge to cut the snowflake.  I added pearl accents to the center and each "bump" of the snowflake.


 Here is a closer look at the snowflake.


One more look at the whole card.  Thanks for looking and happy stamping!

Thursday, November 24, 2011

Simple Snowman Greeting Card

First, HAPPY THANKSGIVING! I hope you all have a wonderful day with family and friends! I will take a moment to acknowledge what I'm thankful for. I am thankful for all that God provides for me; physical, spiritual and emotional. I am grateful for my husband, and all the friends and family God has placed in my life. For those that are still here on Earth who I see way too infrequently, and those who are waiting in heaven.


Today's card meets a few challenges.  Challenge 158 at One Stop Craft Challenge, and three over at
Splitcoaststampers (SCS).  The One Stop Craft Challenge was to use blue.  For the Splitcoaststampers, the first one is Clean and Simple CAS145--Winter/Christmas, the second is Ways to Use it WT350--Fancy Ribbon, no bows or straight lines, and the third is Try a New Technique TLC352--Make Snow. 


The base of the card is Bashful Blue, with a layer of Whisper White that I embossed with a snowflake embossing folder by Cuttlebug.

 I used a square punch and cut out a space for the stamped image to show through.
 The stamp set I used for the outside is Festive Four.
 I used shimmery blue snowflake ribbon for my fancy ribbon challenge.
Here is a close up of the snowman stamped on the front and windowed with the Whisper White.
 Here is a view of the inside sentiment from Festive Favorites.

One more look at the finished card.  Thanks for stopping and happy stamping!

Wednesday, November 23, 2011

Simple Cricut Snowflake Christmas Greeting Card


I mentioned that last weekend my friend Brenda and her children came over to make their Christmas cards for this year.  Brenda is new to stamping and card making, so I helped her design and assemble the cards.  We made 5 designs, 4 of each.

 This was the first card we made.  We ran the top layer through the snowflake embossing folder through the Cuttlebug.
 We used my Cricut Expression to cut out the snowflakes from the Accent Essentials cartridge.  We cut the small ones at 1 inch and the larger ones and 1.5 inches.  We cut the shadows from lavender at the same sizes.
 The packages are from square punches at the same dimensions and tied with silver ribbon.
 Once the layers on the snowflakes were assembled, we covered the top of the white snowflake in glue and added glitter.
 The smalled snowflake and package are raised on pop dots for more dimension.
Here is one more look at our Clean and Simple Christmas card.  Thanks for looking!

Tuesday, November 22, 2011

Simple Ornament Christmas Holiday Greeting Card

I've been in a slump with making cards and being creative lately, but last weekend we had friends over and I helped make their Christmas cards for this year, and it seemed to be the trigger for me to actually make something of my own again.  So, today I'm sharing a Clean and Simple (CAS) Christmas card.

I used a base of Real Red, and layered Whisper White which I embossed with my friend Norma's poinsettia embossing folder.

 I punched out two ornaments from a magazine and used the stamp set Short and Sweet for the sentiment which I punched out with the small oval punch.  I layered that with a scallop oval punch from Real Red.
 I added rhinestone strips for the "string" that the ornaments are suspended from.
 I also added small strips of rhinestones to the "lip" of the ornaments to add a little more bling to the card.


Here is one more final look at the card.  Thanks for stopping by.  Happy stamping!